When it comes to shipping, accuracy is everything. Whether you’re running a business or sending a personal package, getting the shipping label right is crucial. Even the smallest mistake on a shipping label can lead to delivery delays, lost packages, or even angry customers.
To avoid these common pitfalls, you need to ensure your labels are perfect from the start. Want to know how? Let’s walk through how to create and print UPS shipping labels, step by step.
What is a UPS Shipping Label?
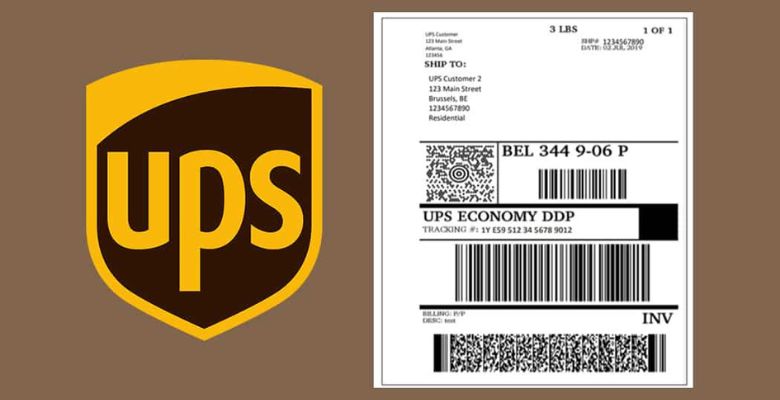
Shipping labels may look simple, but they contain vital information for your shipment to be processed and delivered successfully.
The Breakdown of a UPS Shipping Label
A UPS shipping label includes several important pieces of information:
- Sender’s and receiver’s addresses: This ensures the package reaches the correct destination and can be returned if needed.
- Package tracking number: Enables tracking the shipment through UPS systems, providing updates along the way.
- Shipping method: Specifies how quickly the package will be delivered (e.g., ground shipping, next-day air).
- Barcodes: Used for scanning at various stages of the shipping process to ensure accurate delivery.
Why is this important? Every piece of this information helps UPS accurately route and deliver your package. Without a clear, correct shipping label, your package could be delayed—or worse—lost entirely.
Read Also: Small Business Shipping Options and Best Practices: The Ultimate Guide
Differences Between Regular and Prepaid Shipping Labels
There are two main types of UPS shipping labels: regular shipping labels and prepaid return labels.
- Regular UPS shipping labels are created and paid for at the time of shipping. These labels are typically used when you’re shipping a package to someone and you don’t expect it back.
- Prepaid return labels are created ahead of time and sent to the recipient. These are used for situations where a package might be returned, making the return process easier for the customer.
Why Use Prepaid Labels?
Businesses love prepaid return labels because they simplify the return process, leading to higher customer satisfaction. With a prepaid label, customers don’t have to worry about paying for return shipping—they just drop the package at a UPS location.
Pro Tip: Want to build trust with your customers? Offer prepaid return labels to make returns hassle-free and improve their overall experience.
Steps to Create and Print a UPS Shipping Label

Ready to print your UPS shipping label? Follow these easy steps to ensure you get it right the first time.
Step 1: Create or Log in to a UPS Account
Before you can create a shipping label, you’ll need to set up or log into your UPS account.
- Visit the UPS website and click on “Sign Up” to create a new account.
- If you already have an account, just log in.
Once you’re in, you’ll have access to all the shipping tools you need, including the ability to create and print labels.
Why is this step important? Having an account allows you to manage all your shipments, track packages, and store important shipping information like addresses.
Step 2: Input Shipment or Return Details
Now that you’re logged in, it’s time to start creating your label.
Navigate to the “Create a Shipment” section on your UPS dashboard.
Enter the necessary details about your shipment:
- Weight and dimensions of the package: These must be accurate to avoid extra charges.
- Sender’s and receiver’s addresses: Double-check this information for accuracy—one wrong number or letter could send your package to the wrong place.
- Shipping method: Choose the delivery speed that works for you (e.g., Ground, Next Day Air).
Pro Tip: Always double-check the addresses and package information before moving on to avoid costly mistakes!
Step 3: Choose and Print the Label
Once you’ve input all the necessary details, it’s time to create and print your label.
- Choose the label format: UPS offers several formats, such as PDF (which can be printed on a standard printer) or a thermal label (for a thermal label printer).
- Handling returns? Select the option to create a prepaid return label if needed, and choose whether to email it to the customer or include it in the package.
- No printer? UPS also offers an option to send the label via email or generate a QR code, which can be scanned at any UPS store for printing.
If you’re struggling with printing, check your printer settings or visit a local UPS store to print your labels.
Read More: Does UPS Accept USPS Packages? A Complete Guide to Avoid Confusion
Using Prepaid Labels for Returns
Customer Convenience
Offering prepaid UPS return labels is a smart business move. Here’s why: They make returns easy for your customers, and when the process is easy, customers are much more likely to return in the future.
- Email the label to your customer or include it in the package they receive.
- Customers can drop off the package at any UPS location without having to deal with extra costs or confusion.
Why it matters: Easy returns mean happier customers, which leads to more repeat business and fewer headaches for you!
Where to Attach the Label
The place where you place the shipping label on the package is just as important as its information. Here’s what you need to do:
- Attach the label to the largest surface of the package.
- Make sure the label is securely fastened and completely visible.
- If you’re reusing packaging, remove or cover any old labels to prevent confusion during shipment.
Common Mistakes and Challenges

Mistakes happen, but some are avoidable. Avoid these common pitfalls to ensure a smooth shipping process.
Common Mistakes with Regular Shipping Labels
- Incorrect address details: A small typo can result in your package being delayed or delivered to the wrong location. Always double-check!
- Improper label placement: A label that’s hard to read or scan can cause issues. Make sure the label is easy for UPS to scan at all stages of the shipping process.
Common Challenges with Prepaid Return Labels
- Lost labels: It happens. If a customer loses their return label, they can easily reprint it from their UPS account.
- Expired labels: Make sure your customers know if there’s an expiration date on the prepaid return label. If it expires, they won’t be able to use it.
| Issue | Solution |
| Lost label | Log in and reprint from your UPS account |
| Expired label | Ensure customers know the expiration date upfront |
Conclusion
Accurate shipping labels are the foundation of a smooth shipping process. Whether you’re sending products to customers or handling returns, a well-crafted UPS shipping label ensures efficiency, customer satisfaction, and fewer issues.
Prepaid return labels, in particular, are a valuable tool for businesses looking to improve customer experience. They simplify the return process and build customer trust and loyalty.
Don’t wait—start creating your UPS labels today and enjoy streamlined shipping and returns!
Have questions about creating a UPS label? Drop them in the comments below, and we’ll help you out!
“Need help printing your first label? Sign up for a free UPS account today and streamline your shipping process. Don’t miss out—start shipping faster and more accurately!”


